Showing posts with label OUGD503 Studio Brief 1. Show all posts

Monday, 18 March 2019

SB1: Interim Crit

Today I had an interim crit with Helena about SB1 mapping as it's due next week. Honestly, I have not been focused enough on this module yet because of the PPP submission, so I haven't had any further developments for it as of now. However, I did outline to her as much as I could about the brief and what I wanted to do and she gave me really good ideas. I also asked her if it was a 'right' idea because it's not really mapping a location but certain movements and the end point is to 'learn' the movements.

I also asked her, if it was worth making a flipbook or any other books (as I was telling her, how I was kind of getting sick of making books this year for each module and it doesn't really answer the interactivity part of the brief) which was suggested in the first crit, and she said no (glad she did!)

Feedback:
  • The Rodina - the do a similar thing to what I'm trying to convey, maybe research more on this.
  • Make a projection - not have it that space? think of the exhibition space? Could I have it just on the corner? 
  • How can I use space to make the projection interact with the audience ? 
  • Different viewpoints - how will it look form an angle, do the audience need to look at it from certain angle?
  • Highlight different parts of the body for movement emphasis - elbow, hands, knees, neck etc.
Thoughts & Reflections:

I thought the crit with Helena was really good and actually was much more helpful than the first crit that I had. Now I also had a clearer idea of which parts I could focus on e.g. movements of specific limbs etc. viewpoints or angles. How I still need to incorporate screen printing in a way here so I will need to research more on how I can do it in print rather than projection. 

Friday, 15 February 2019

End of Module Evaluation

Overall, I think this whole module has been the most stressful and often unproductive I have ever been. Firstly, especially because we just came back form the holidays and had employability week for 2 weeks I think it had messed up my whole work schedule and pattern in general. I do understand that it is all part of the module and part of being organised and timing myself right, but at the same time, I feel like I just couldn't get enough time for myself in order to work on two briefs at the same time, because we also had activities that we had to do outside of employability week hours in order to present in actual employability week lectures, so I think that's when my work started to pile up.

I think the biggest mistake I made as well was the fact that I got really stuck on the SB1 RSA brief that I was doing that I've neglected the Graphic Design aspect of it that halfway through it, I was already questioning myself if I was doing the right thing or not, and because I was answering the RSA brief it felt like I was but at the same time, I wasn't and would probably not get a high grade because the work I was doing is not applicable to Graphic Design as much. I also didn't get to have a crits or ask questions because at the same time I didn't have much time to think about SB1 because SB2 was just slowly taking over my time more than it should, and I couldn't stop because it was a collaborative week and we had to work around everyone's schedule, especially because there were four of us. At the final crit though, I feel like all the thoughts that I've had about my work not really being applicable had just been confirmed, made me relieved and panicked in a way because now I know I can work around it to make it applicable to Graphic Design, but at the same time I only had 1 week to do it all, along with all the other work piling up. Although, I did manage to create a solution I know it's not the best I've done so far.

SB2 on the other hand was very easy going in a way that I was able to communicate with our collaborators really well as we had similar likes and ideas that we could bounce back and forth each other. Communicating and giving feedback and opinions was also really important, because at times I feel like the collaborators form Illustration wasn't really giving ideas or suggestions back but rather just confirming they are happy with what we had that i really had to go and ask them what thye think of specific things within the publication. Collaborating with Jocel, did help though because she was always there ready to bounce ideas and opinions with me and discuss things that I couldn't with the collaborators. However, during this whole module, SB2 was also taking over a bit too much of it which was constantly stressful, but I think we pulled through at the end.

All in all, I didn't quite enjoy this module much, and hoped that we had extra time on it as it seemed really short. The briefs that I did which seemed fun in the beginning became a bit too much sometimes however, I think that I pulled through and got myself on track again and made solutions and final outcomes which I'm okay about but not exactly happy with to be honest.

SB1: Final Outcome (Catalogue Insert)

After my development and refinements, this is my final outcome.

The use of the dark brown side of the paper highlights the embossed further making it a more impactful design which can appeal to the audience firsthand. In the addition, the paper stock also reflects the material for the product as well which solidifies the whole visual aesthetic of the product and the catalogue insert design itself. While embossing, it's weight also made it very easy to create prominent embossed shapes. Practically, it's also very cheap which makes it ideal for mass production when it is inserted in furniture catalogues. In addition, to the paper stock, the binding method is also appropriate and fits the them of the design as it highlights the handmade and natural style of the design and the product, giving the overall design a friendly and approachable feel. Coptic stitch binding also allows for a secure and durable bind to the design making it very practical for use, although the only downside is the fact that it may take longer to produce a mass of the design.

The typeface sued 'Futura' is also very appropriate and compliments the overall look of the design. It's modern and contemporary characteristic matches the homely and rough style of the design which make sit much more suitable than basic serif types or neutral fonts like Helvetica and Arial. Using it in the publication is also effective as it encompasses the information about the design and product which lets the readers know what it's all about without any lengthy information added. Also, having illustrations alongside may help the readers visualise the layers of the product better along with the embossed design that goes along with it.

Having the embossed design as the main point of the publication gives the insert an point  of interest and edge amongst competitors as it has a very dynamic and interactive aspect that readers can really engage with and play around with, which in turn may make them actually purchase the product.

However, having said this there are some things that I want to improve on the design. As I ran out of time, I didn't get to laser cut the tile again so some letters still don't up. I thought this was a really big let down because the title is the first thing people see and in the last module, I was pointed out on how the audience will react to a publication that doesn't have a title, as mine didn't have one. However, for this module, although I did try due to time constraints I couldn't , therefore I tried to compensate with the insert B6 publication title in order to give the readers a clearer indication of what it is.

Also, the colours on the insert publication, smudged and are quite faded and patchy, which may be the printer's fault. If I had more time I wish to have been able to print and bind it again. Overall, though I think I did an okay job at producing an outcome in the last week which is sufficient enough and is quite resolved in a way that it answers the brief and also reflects the solution that I had produced for the competition brief as well.


SB1: Submission Boards

Here are the submission boards that I've created which were a requirement to the RSA 'Beyond the Kitchen Table' brief that I did for SB1.


Tuesday, 12 February 2019

SB1: Further Developments

Following my decisions yesterday, I developed the idea further.

Information Insert 

As well as visual information, I wanted the readers to obviously have actual written content they can read in order to have knowledge on what they are trying to buy in order for them to actually engage and buy the product. I thought of having a small B6 page publication insert which have short summarises and illustrations o f each part in order to give the readers a quick and easily understandable information rather than lengthy information like in  normal catalogues. I experimented it on the Bockingford white paper that I had however, I didn't like how it contrasted too much with the brown tone of the Cairn Eco Paper. Perhaps the previous Fabriano Unica Cream paper will work better as they have similar tones as the Cairn Eco paper and have similar qualities that present the idea well. Also, I printing the illustrations black but I think they contrast the paper stock too much so I'm going to opt for brown too in order to compliment the aesthetic overall making the whole design look complete and professional.


Typeface

I decided to use 'Futura' as the typeface for the publication, as I felt it fitted and complimented the rough and 'organic' look of the embossed design due to its modern and contemporary characteristics. As well as the fact that I liked how quite geometric the typeface is that it's looks professional and casual at the same time. Also, I choose Futura as the typeface as if I chose a serif font I think it would just overkill the aesthetic of the design and if I chose a neutral type like 'Helvetica' it would just look really really bland, and I thought Futura was a good mmix of a fun and informative type that's why I chose it.

Stab Stitch Binding

 Although, I did say I intended the design to be a concertina I did want to explore another avenue that I could possibly do for the binding as I felt that it should be able to take the readers on a smooth and controlled manner in order for them to understand the layers of the pages and how they interact and relate to the publication inserted within it. I thought that stab stitch would be a great quick binding method that isn't only durable but also aesthetically pleasing to look at. However, upon doing this binding, I found that the pages didn't flip as smoothly as I envisions and made me scared of flipping the pages in case the paper rips. Reflecting this on an audience POV, readers would probably have a hard time navigating through it and would not try to read further because of this making it ineffective. Therefore, I may explore other methods instead, and also take into account the publication insert as well. Should I bind it together with the concertina design? should it be an insert within an insert to a catalogue?


Lasercut

Previously, the laser cut title didn't work well because of the letter not cutting properly, therefore i decided to make them all capital sand it a much bigger point size hoping all of it would cut through. However, a similar thing occurred, although it is much better than the previous one. But, because of time constraints and availability of room facilities, I couldn't develop more therefore I had to use the one I had. The title is much more readable now, still not complete which is a shame as it's for the front page and its needs to be impactful and easily understandable by the readers when they read it. Although, because it is an insert within a catalogue, would the readers already probably guess its
content? Or could emphasise the title by having it on the front of the B6 publication insert instead. Furthermore, I've also laser cut the missing layers of the design as well as the new version of the final layer which shows the all the layers better and more clearly.


More Embossing

After choosing my final paper stock to start emboss on the Cairn Eco Kraft stock that I have.The embossing went really smoothly and I was able to make various versions of it, as well as a version with both of the differing brown tones shown. I did this as I still wasn't sure which side was better aesthetically, as I felt that the dark brown side was more prominent and would maybe have more impact with the embossed shapes, however the light brown has a nice soft tone and aesthetic to it which I also liked. I asked some of my peers for opinion and they agreed with on on the dark brown side and suggested it was the better side as well so therefore I think for the final I am choosing the dark brown side of the paper as the main front of the design.

dark brown side
light brown side

Binding Method 


After the stab stitch binding, I thought of coptic binding as another alternative as I've also decided that I'm going to sew in the insert B6 publication so it's secure inside as well as give the design some depth and bulk when handled. Coptic stitch is perfect as it securely holds the pages together without them ripping or breaking apart.


Thoughts & Reflection: 

I think that this development and refinement stage was really fruitful and speed up my design process better in order for me to produce my final before the deadline and still have time to do my writing for design boards. I think that I've resolved my ideas more now in order for my final to be resolved.

Monday, 11 February 2019

SB1: Initial Development Experiments

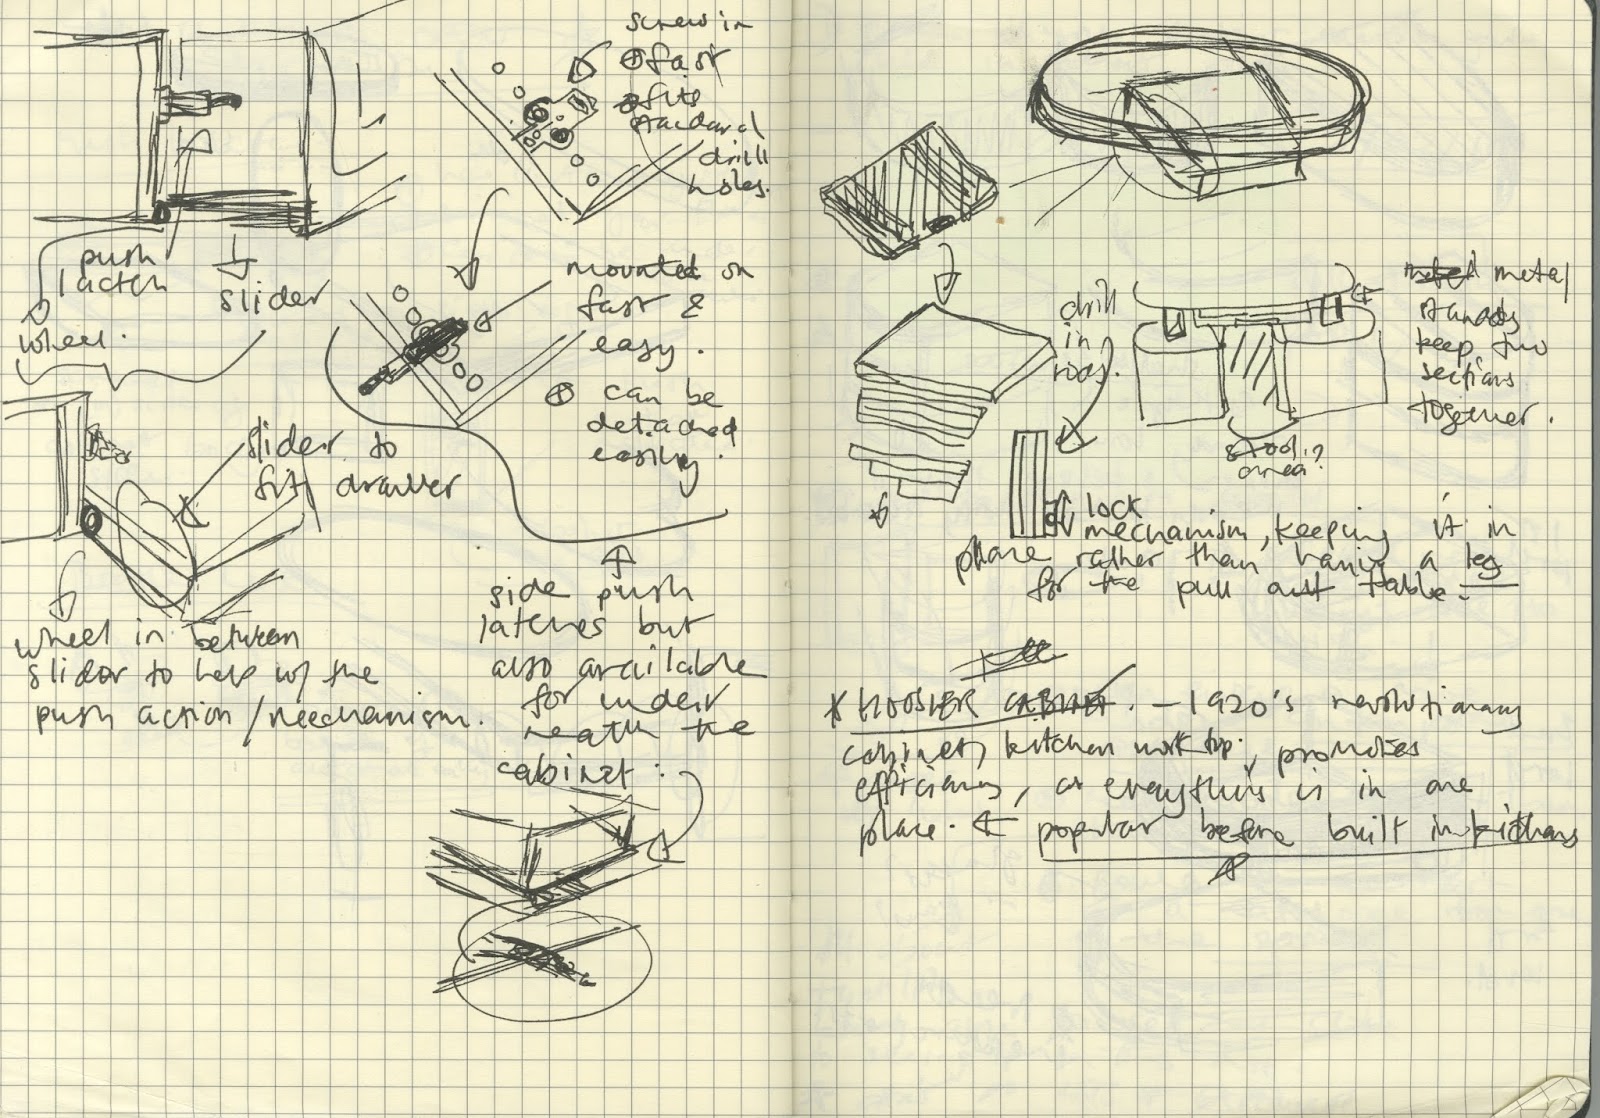
Following my initial ideas, I picked idea #3 which was the (Design Concertina) idea. I felt that this idea could really translate the solution really well as it has a strong dynamic element and tactile aspect which could appeal to the target users. I also think that using this will also give the target users more interest towards the product as they get to touch similar aspects of it just like how they would when viewing the actual product in store. Users will have a better understanding of what they are looking at and refer back to their own references on how they want the product to look aesthetically in their own homes. Furthermore, it's also dynamic in a way that users can interact with it due to it being a concertina shape and being able to pull out the different sections give them a better sense of the product design.

Printing Process

In order to further solidify this idea, I thought of embossing as an effective process in presenting these concepts. Apart form it's tactile quality, embossing also gives a very nice natural, and homely feel to the whole design, which reflect back the tone of voice  and ethos that the product is trying to convey - a way to become more socially active and communicate more in the kitchen area and beyond. 


Laser Cutting

In order to create the embossed pieces, I had to laser cut the shapes first. The shapes themselves turned out really well and they were cut to size of the actual publication already which is B% (as this is how most catalogues are set out). However, when I tried to laser cut the Title (A Multigenerational Kitchen Island) some of the letters didn't cut all the way through maybe because they were in small letter and were too small to cut. However, I still used them in my embossing experiments as I didn't want to waste time as well as materials. Although, for further developing the design I well make sure that I change it's setting, maybe change it all to capitals?


Furthermore, in order to apply accurate information in the design, I thought of having the shapes that are going to be embossed as the scale down version of the actual measurements of the product:
  • Main Table - Originally 2 m x 0.80 m ; scaled down to 20cm x 8 cm
  • Pull Out Table  - Originally 1 m x 1.4 m ; scaled down to 10cm x 14cm 
  • Cabinet - Originally 0.26 m x 0.15 m ; scaled down to 26 cm to 15 cm
Paper Stock

Bockinhford (190gsm)

I decided to experiment with this paper stock as I really liked the clean almost frost white colour that it has. I thought that the embossed shapes would look really nice and prominent on it. 

+ shaped were really prominent maybe because of it's thickness?
+looks really clean and sleek

- can get dirty easily
- in certain lights shapes might not be seen properly
- looks a bit clinical
- is it too basic and simple?

Fabricano Unica Cream (250 gsm) - 

Afterwards, I decided to experiment on the cream version of the paper stock as I thought the cream tone would give the the design the character that it lacked when on the white paper stock. I just thought that on the white paper stock it looked too plain and doesn't really have any appeal at all. 

+ more pleasing to look at that the white version
+ also prominent shapes maybe due to it being 250 gsm thick
+ It would look good with another paper stock or combined with something darker to bring out that 'natural', homely feel. 

Cairn Eco Kraft (170 gsm) - 

I also decided to test on the Cairn eco paper as I really liked the earthy natural quality it has. I think that using this paper stock will also be a good visual reference on how the table will look like and the material that it will be made out of. I think it may also effectively highlight the homely style and friendly quality that the product in meant to portray to the audience.

+visually it strongly references and shows the material the product will be made out of
+ aesthetically successful at portraying the homely feel
                                                      +cheap
                                                      +easily embossed on even though it's only 170gsm. 

                                                       - may rip easily when being rolled when embossing
                                                       - two sides have slightly different tones (may not be consistent?)

Thoughts & reflections:

After doing these experiments I showed it to my peer in order to gather feedback. All of them really liked and favoured the Cairn Eco paper stock, as they thought the embossed shaped were a lot more prominent and noticeable on it because it's dark. It also made them think of the material the table is going to be made out of (wood), which I think highlights that it succeeds this representation when shown to the actual audiences as well. Overall, following my peers I think I will chose the Cairn Eco stock as the final paper stock to use as it does the job aesthetically as well as design wise. It's also very cheap, however the two different shade on both sides, I think I can work it to my advantage as in embossing you also get two different surfaces, therefore working this to my advantages, the audiences can feel various textures and colours whilst going through the concertina as well, enhancing their experience and senses, which may engage them more with the design and the product.

Friday, 8 February 2019

SB1: Initial Ideas (Bringing back the Graphic Design aspect to my Idea)

Immediately after the crit, I decided to think of ideas which I can show my designs in a more effective way.

Idea #1 - Design/ Function Booklet

For this idea I was thinking of creating a manual book let that would reflect the ideas that I had on the proposal board for the brief. Similar to the proposal board, the manual will show the expanding diagram solution with the information and details about it. The manual however, will take the readers step by step and will include more information and description about the product, much like what they would see in catalogues. I also researched some of the catalogues that the sponsor companies of the brief have and they were all pretty much standard catalogues therefore maybe having this kind of manual will interest more audiences.

+ will act similar as a catalogue 
+ shows detailed visuals such as the screw/ drills which would help audiences to choose it would be appropriate for their needs etc.
+ can be easily mass produced as it can be digitally printed.

- people may think it's redundant as they may feel like the catalogue is already enough. 
- isn't interesting enough to stand on it's own


Idea #2 Design Blueprint

Feeding off the proposal board again, I'm thinking of creating a blueprint which shows the diagram in a more tactile and visually interesting way by using specific paper stocks and colours that would refer to the materials used for the actual product. The blueprint can also be extended to become a poster of leaflets and other promotional product which can be distributed in order to promote the product.


+ can be transferable in different mediums
+ can be very tactile and play with textures etc. to show the qualities of the product 
+ can be put as inserts in catalogues which may make the audiences read through further and look  at other products. 

- a mix of digital and handmade techniques - can be hard to line up or take time to produce.
- needs to be with something else to attract consumers
- consumers may not know what it's for at first glance - so will still need to include a good amount of descriptions.

Idea #3 Design Concertina 

For this idea, I thought maybe adding the 'tactile' element with a concertina book design would be quite interesting. I thought of possibly printing each section of the furniture on each page of the concertina reflecting how they are made in 'layers' or sections; as well as give the readers clear pace of how they look visually. Putting in the tactile element to it, I thought maybe using embossing or textured process would work really well in order to translate the idea of a natural and homely product that may appeal to the target users.


+ Clear visualisations of the expanding diagram idea
+ Dynamic and tactile element which adds a personal touch and more appeal to present the ethos of the product
+ can stand on it's own or be inserted in existing catalogues

- will need to have the right paper stock in order to not look tacky
- will need to be hand made so might take time 
- not time efficient so mass production might be limited

Thoughts & Reflections:

I think that as of now I've finally thought of sufficient ideas which I can pick and refine in order to translate my ideas  effectively and produce a piece of graphic design which successfully presents the ideas that I have as well. Also, in the time that I've got left I think that I'll be able to initiate some development and the final for these ideas in order to submit on time on Friday.

Final Crit

Today, we had our final crit for this responsive module and thankfully after the crit I got the clarification that I needed in order to steer me back in the right direction for this brief.

These are the responses that I've got in the crit:


Afterwards, it was clear that I was doing more product design as people pinpointed how it was like a manual or instruction and a proposal for something, which they were right about, at the same time it wasn't really related to my practice. Thankfully though I got suggestions and ideas on how I can bring back graphic design into it which was reassuring.

Thoughts & Reflections:

The crit went as I expected and at the same time I think that I've got the things that I wanted to hear as well as ideas on how I can tackle this problem. People suggested that maybe I can take this 'instruction manual' aspect and create an actual manual for the product elements that users can read. Maybe a blueprint showing the different elements with reference to the product elements itself, or a branding campaign?

At the end of it, I think it's more about using all the research and ideas that I've already got for the actual RSA brief and implementing it to more in my Graphic Design practice.

SB1: Existing Publications in General

I also looked at existing publication in general along with the ones that you see in university. I found that they are much more experimental and require much more effort as they have actually been made by hand rather than by a machine which may make their mass production quality less efficient. However, they look very interesting and definitely eye-catching


  • Very dynamic and has impactful use of printing and design processes.
  • Interesting binding method which may appeal to their audience and enhance its aesthetic quality.
  • May be able to be mass produced in a large amount due to time and labour costs


Thoughts & reflection:

What I've gathered from this is that these publication has effectively used design elements such as colour, type and paper stock in order to present their concept in an interesting and effective manner. Reflecting this back to my own design, I think that I should also the same and really focus the link between the design elements and the actual product in order to relay the information to the users in a much more engaging and enjoyable way rather than just making a manual that they'll have to read.

Wednesday, 6 February 2019

SB1: Design Development

After doing my initial development sketches, in order to fit the brief criteria I finally started to sketch them digitally in order to make it look more professional and refined. I decided to make it look like an expanding diagram of all the parts of the table design in order to specifically show what they look like and for me to give brief explanations as to what it is and why they are there.

I think doing it in this format will make my proposal easier to understand and visualise as it is done in a format where each component is under each other,  just like how they would be when made physically. In addition, the addition of the zoomed in elements to show details also work really well because it pinpoints aspects that judges should look out in order to have a clear understanding of how the solution will be implemented in real life.

The colour I chose is also in reference to the material I want the solution to be made with in real life - wood. I think doing this just adds a bit more refinement to the proposal, and although it may not be exactly accurate to the material colour and or texture, it gives a better view and aesthetic reference. Furthermore, I also added brief descriptions of what and how the element will be implemented giving justifications to my solution and ideas.


Thoughts & Reflections:

Overall, I think that the proposal element is coming together well and I am showing and answering the brief quite well. However, as I've been doing this brief and have been researching more information about it, I fee like it's going way out of the Graphic Design sphere. Although, it is 'still' design it's more product than graphic, therefore I feel like now I've gone way too deep in this sphere and been answering the RSA brief more so that I've kind of neglected the module brief; that I've become quite lost on how I can bring back the Graphic Design to it. At the same time, I don't wanna back out form this idea as I realistically don't have enough time, plus I actually quite enjoy it. However, perhaps because I have all these visuals, references and research I think I'll be able to think of a way of implementing this to graphic design, although right now I'm not really sure yet what that is. Luckily, though we have our final crit on Friday and I'm thinking of showing this brief to them. Hopefully, I can get some confirmation and guidance on how I can bring back Graphic Design to this brief. Although, I know I probably don't have enough time I'm hoping to really tie this back round.

SB1: Research on Table Mechanisms

As I was sketching my ideas, I thought to further make my idea more plausible, it also needs to have functional and practical research behind it and some references on the bets way it can be made physically so I looked at some mechanisms which I thought would be appropriate in creating it.

Possible Mechanisms

Pull/Slide (for the pull out multipurpose table - I found that the easier way to possibly create this, is by using slidable metal rods screwed on the table which will slide one by one as the table is pulled out. It also include a lock mechanism screwed in order to keep the table still when being used. I did find another when it also includes a pull out table leg to keep it still, however it may be a hassle and a bit dangerous especially with little children around, therefore I think the slide rods are a better option.


Push to Open (for cabinet drawers) - For the cabinet mechanism, I found that push latches are the best, as they can be easily screwed on the side or bottom of the cabinet drawers. In addition, they can also be adjustable depending on the sizes of the cabinet. It's also quite small and hidden so it wont be noticeable.

Monday, 28 January 2019

Interim Module Brief Crit

For this crit me andJocel decided to present together in order to talk about our collaborative brief for SB2 - 'That's So Astro'. In the presentation we clearly talked them through the process fo the brief and we've created a basic script in order to not miss info out and at the same time in order to present a smooth presentation with smooth transitions between us too. I think this really helped as I think that it helped us get insightful feedback form the peers and Helena who watched and listened to out presentation.

WWW:

  • They really liked the typography that we created for both publication issues and were strong on their own rights.
  • The idea was good
EBI:
  • It's not cohesive enough for the reader's to know that the next issue is from the same publication (maybe use the same font for the title as use the custom font for the headings within the publication instead, perhaps Helvetica? as it's a neutral font?) - *We did say that the layout for the sub headings on the front covers was the same in order to create a subtle uniformity and reference to the publication however maybe this was TOO SUBTLE and we thought that it was only right that we change this as we did agree with the feedback and hearing people's points from an audience perspective our initial front cover layout is not strong enough to create a uniformed presence for the readers. 
  • For the Pisces publication, maybe use a contrasting sans serif font for the headings as well as to conform to the new font on the front cover? - *We thought this idea would be viable as it would only make since to keep everything cohesive with the same font, style, point etc. also the fact that they recommended a sans serif type might also be a stronger idea as it can compliment a wide range of styles as the font is non conforming to any characteristics apart from being neutral and balanced. If anything maybe the font will highlight the aesthetic and characteristic of the actual publication itself as it doesn't draw anything away from it. 
  • What other additional materials are going to be there - *We've discussed that we are planning to include additional materials such as stickers and posters which readers can use and hang up in order for them to create attachment to the publication or maybe expect for the next one to come out creating a solid readership for the publication as readers are  not only getting information but also physical elements which they can use themselves. 
Thoughts & Reflection:

I thought that the crit went better that I expected and we got some really ncie feedback that we can work on to improve our publication, it also made us realise that some of our decisions before weren't as strong and would no work on actual readers as they made us realise the limitations of restrictions that we've made for ourselves. In terms of production though, Helena has suggested me to use Cyclus paper as opposed to sugar paper as I showed them a draft print out of the publication and I've voiced my opinion on my struggle to find the appropriate paper for it as I initially thought sugar paper would be good however it was too rough and thick and overall felt cheap. I will explore the usage of this stock and it's also a stock I've used similarly in the past module so I've had experience with it as well.

Saturday, 26 January 2019

What I learnt from employability week

Throughout employability week, I tried to fit in my personal work for SB1 and SB2 as well, however I found it quite difficult as we had to attend the sessions and also do some tasks outside the sessions relating to employability week as well, e.g. make a presentation. Having all these extra things to do for employability week made me really stressed as I had less time to do my studio briefs as well as the fact that it messed up the timetable that I made for myself. I also couldn't concentrate well on the studio briefs and felt that I was very stagnant during the 2 weeks and wasn't going any where with my briefs. During this time as well I felt that SB2 had more content to work with therefore I focused on it more that SB1 (still). However, during this time I did attempt to focus more on Sb1 as well, however it was very hard as I started to feel really overwhelmed by everything and thinking that I'm not going to get anything done.

However, despite this though I did learnt a lot from employability week, particularly the Creativity in Context session which I thought was really entertaining and insightful. I learnt about the different ways of how job roles are described and made me more confident that their are a lot more niche and wide range of professions that comes under the Graphic Design umbrella and made me realise that I have skills for jobs that I never thought of before. Also, the Self Confidence and Networking session with 'The Light Bulb People' was very fun as Rick was very engaging with us which helped me focus on what he was talking about as well. In particular as well, I really enjoyed the 'Mindfulness' session with Lucile as I had it at a time when I was feeling the most stressed out too so her session helped me to calm down a bit and made me think of ways in which I could improve on it as well. 

Overall, employability fortnight was quite an educative 2 weeks and I've learnt various techniques and ways about employment in the future and how to go about it. However, at the same time I feel like it was quite long at times and some sessions could've been put together into one session e.g the job application and interview sessions as they were very similar and made senses to come together. Putting sessions together could've given use more time to work on our studio briefs during the employability fortnight and would've been more time efficient as well.

Friday, 25 January 2019

SB1: Chosen Idea Sketch Development

From the initial ideas that I created I think that the Kitchen table idea is the most promising as it can be applied to a variety of kitchen layouts which widens it's audience reach- primarily to multigenerational families but also to smaller, younger modern audiences.


Initially, I had the idea of putting a Lazy Susan in the middle of the main oblong table but I realised that it's kind of irrelevant as it probably won't hold a lot of food which makes it redundant and a hassle than helpful so I scrapped this idea. I think that the pull out table is sufficient enough and is actually more than helpful and convenient on it's own.


Convenience 

I've started to sketch out developments of what is actually possible to make, as in my initial it seems very impossible to actually have that many variations of storage units under and would probably only make it harder for users to sit around it. I've pinpointed the essential needs users will need in order to work on/with while using the kitchen island which are: plates, utensils, pots and pans, glasses. Basically just the basic essentials for eating and preparing food. I choose these as it would be more convenient for them as they won't have to keep on moving around the whole kitchen in order to move quickly move.

Safety

As it's aimed at multigenerational families it's also important to think about safety. I've specifically looked at safety for children and elderly. I thought that having a sliding, or push action mechanism for opening cabinet rather than handles would be much more appropriate. Having push acton mechanism will make it easier for elder who have decreased motor skills or arthritis to open/close cabinets without help. In addition, it'll also decrease the accidents children may have such as bumping onto the handles; as well as make it hard for them to accidentally open cabinets and hurt themselves.


Flexibility

After looking at different kitchen layouts in my research, I found that this idea would also be possibly applied to them. In accordance to the kitchen layout and space, the kitchen island can be changed in size. Though it's small in size it will still have all the elements but in a smaller scale. maybe I could have 3 standard sizes for the kitchen island which can fit a variety of kitchen layouts.

Thoughts & Reflection:

I think that after choosing from my initial ideas, I have a clearer view of what the solution can. Also, because I have a clearer idea of the main needs in order to answer the problem asked in the brief, it will be more effective and complete because of all the considerations that I've done. Also, I will start to actually digitally draw and refine these sketches in order to fit the briefs deliverables of a digital proposal for spatial/product design.

Sunday, 20 January 2019

SB1: Initial Ideas

After doing a breath of research about the theme and idea of the brief. I've drafted several ideas which I think could be a possible answer/ solution to the problem that the brief is trying to tackle.

Keys:

+ = postive
- = negative

Idea #1 (Sliding Worktop) 

From my research I've found that particularly for one wall kitchen layouts there's a minimal area of space in which food preparation can be done as the work triangle is very closed off due to it being linear. To solve this, I thought adding a sliding worktop could work in order to open up the preparation space, having more room for food prep. The worktop will be stationary under the initial worktop on the kitchen and will be pulled out the in order to be used (groove underneath instead of a handle). I've also thought to maximise the usage of the additional worktop, the space underneath may also be used as sliding storage spaces, using as much space of the additional worktop as possible.

+ easy to move (sliding/pulling action) - won't be too hard for elders to pull out and children won't know it can be pulled as the groove will be more discreet than a handle, avoiding them hurting themselves) 
+additional storage can be split in various ways in order to be maximised
+additional storage can also have it's own sliding, pushing, pulling manoeuvres for easier access
+ having additional storage underneath reduces time to walk around the kitchen as appliance, ingredients and equipment can be stored there.
+reduces movement between cooker and sink (less hassle)
+ can be a great way to engage in cooking in a group as two/ or more people can work on both sides, engaging in activity and fun in the kitchen
+ perfect for compact kitchens as a way to maximise space use
+ don't have to be used all the time (not on the way)

- can make the kitchen seem smaller than it already is (might be too tight)
- cause kitchen traffic is too many people are in at one (but, it may not be a problem? as only cooker is closed off, so only the person cooking is there and others can still use the sink and access the fridge)
-safety (may hit children accidentally or elders)
- needs to have a 'brake' so it doesn't move about
-wheels brakes?brakes on the inside/ underneath portion ( i need to explore this area more)
- only focus on one wall kitchen

Idea #2 (Kitchen Island)

This idea takes on the idea of a 'kitchen hatch' or 'through room' in which families/ groups of people can have an engaging time in a multipurpose interconnected kitchen and dining area. This is reinforced by the having multipurpose kitchen island, not only serving as a dining table but also a compact storage system with various cabinets with a push to open systems for comfort, rotating storage for flexibility and ease of access and open ledge for chairs as well as wine/ingredients slots. The kitchen island will be in wide oblong shape for a slimmer and wider fit, rather than a rectangle/square shape. It will also have a smart feature which includes a controlled 'Lazy Susan' opening up from the centre of the island.

+ lots of storage spaces at the bottom, maximise capacity
+ ideal for through rooms, no separation from the kitchen so the space will also feel bigger
+ encourages more activity in the kitchen/dining area as it can become an area for studying, conversation, resting and playing when not in use for eating
+ less movement from kitchen to dining area as it all in one place
+ don't have to buy dining table
+ curved edges are safe for children
+ push access in easy, especially for elders
+ lazy susan encourages sharing (food and conversation) as everything will be centred towards it. 
+ fit for multigenerational families or big families in general 
+ can work for L shape kitchens or a as an extension of an open gallery kitchen

- will probably be very expensive
- may cause traffic in kitchen as both sides is open
- may not fit compact kitchens (maybe have a variation of sizes though?)
- is this too ambitious? theres so many elements is this even plausible in real life?
- elders will have problems reaching the bottom storage

Idea #3 (Corner Utensil Storage)

Idea 3 comes from part of my research which points out that kitchen corners are becoming wasted spaces as they are hard to reach and an awkward place in the kitchen especially in small compact kitchens. In order to utilise this space, instead of a straight 90 degrees it could be 45 degrees and slightly longer creating extra worktop space. The extra wide space on the bottom allows for a more diverse storage system. I thought of having a pyramid storage system accommodating to various utensils e.g. knife, spoon, forks, glasses, plates etc. It will be shallow for easier access (people don't have to awkward squat). It will also have top drawers with multiples storage systems. First top will be a slide opening system for easy access, as opposed to normal cabinet door. Second drawer will be at least a set of 2 or 3 push vertical drawers with hook systems for spatulas and other cooking utensils.
Using this corner as a utensil corner may also help the flow of preparation as it lessens movement as its centred so users can freely work in the 'L' workflow. Essentially I think it becomes a of the kitchen triangle (making is a kitchen square).

+ versatile storage system fit for compact kitchens and big kitchens 
+ specialised storage so makes everything systematic and uniformed in terms of where equipment is placed
+ easy opening systems/ manoeuvres accommodating to elders with motor problems (less squatting because of shallow cabinets)
+ more accessible in general as it's not an awkward 90 degrees (additional workspace) - connects the stove and sink freely 
+ can work not just a utensil storage space - maybe a snack storage space?, ingredients, dry food storage? as long as it's a specialised storage for a set of particular needs as it allows for a better kitchen system.

- 45 degree angle makes the space look smaller (especially for gallery and u shaped kitchens)
- more suitable for l shaped kitchens with open space. 
- not as innovative tbh
- can be pushed more
- dangerous for small children - pyramid storage will need to be opened quite widely 

Thoughts & Reflections:


I think because from the research that I did I felt that I had to accommodate to a wide spectrum of users therefore I came up with these ideas. At first I only wanted to focus on a specific type of users e.g. families or elderly, however I thought that that's not completely answering the brief as it asks me to create a solution which engages people together and encourages them to "eat food, entertain, engage in hobbies or work, and enjoy being together." Having this in mind, I tried to come up with ideas that tries to aim to accommodate to all.

Furthermore, I honestly had a hard time coming up with ideas, as I felt like everything has been done already and there's already such as wide spectrum of kitchen designs that I feel like it will really hard for me to come up with something original, and even if I did I feel like it won't be good enough; also there's only so much you can do with a kitchen! Therefore, I thought creating solutions that best accommodates the layouts and area of the kitchen will be the best way, and creating alternative designs which will create a stronger reinforcement of engagement will be best.


The next steps for me now is to decide which idea is the best and which ones has the best possible benefits and advantages which I can take further in order to create developments and refinements on.

SB1: (Research) Technological Advancement Effects on Kitchen Design

We are in an era where technology is advancing very quickly and has been adapted in order to be apart of our daily lives and needs. In particular technology today has been applied in our kitchen in order for a more efficient and quick way of navigating in the kitchen space and using appliances faster and better.

In particular, I'm going to explore the idea of smart kitchens and how the shape today's kitchens.


What is a Smart Kitchen


Usage of technology in  order to create a more energy efficient and environmentally friendly appliances as well as to save space within the area. 


Examples


  • Smart Fridges - can list their contents or automatically order items, energy efficient in terms of humanities 
  • Smart washing machines - can be switched on remotely and turn itself off once done saving electricity and energy efficient.
  • Smart Ovens/ cookers - can be turned on remotely and actively programmed e.g. let the ovne know what kind of meat you're cooking for best cooking quality
  • Smart Stoves - can be connected to Wifi to ensure stoves are turn off or remotely operated to preheat before arriving home etc.
Specific Appliances
  • GeniCan - comes with your bin, allows you to scan item' barcodes or say through voice recognition what you need. Item is then added to a list on a Genican app (allows users to not miss any groceries).
  • Scosche's BoomBottle MM - a bluetooth speaker with an in built can opener; simple but may be actually quite helpful. 
  • Samsung Family Hub 3.0 - smart fridges with in built 21.5 inch screen offering various apps e.g. whiteboard, stickiboard, entertainment apps w/ a smart voice assistant. Three in built camera's inside and able to connect to a Smart Samsung TV. Also able to view home camera's doorbells etc. Fit for families, successfully integrate a functional and entertaining purpose to the fridge. However, very expensive at $3,052.
Thoughts & Reflection:

I think the idea of possibly integrating smart features to a kitchen could possibly enhance it's efficient and make things work better in the kitchen. It may also help make the kitchen a more engaging part of the house where members would spend time together. However, it does have it's downfalls, such as risk of breaching privacy, as information are involved and appliances such as smart fridges can track everyone's movement or with camera's etc. 

https://plentific.com/advice/how-create-smart-kitchen-626/ 
https://www.the-ambient.com/reviews/best-smart-kitchen-devices-469

SB1: (Research) Effects of Urbanisation on Kitchen Space

Urbanisation

the process of making an area more urban; is the increase in the proportion of people living in towns and cities. 
  • by 2050 there will be about 2.5 million more people mainly in Africa and Asia.
Due to urbanisation, for the past few years people have decided to join the "tiny house movement" (moving to smaller houses, for more cost efficient and environmentally friendly lifestyle). Another more prominent movement is having 'compact kitchens', especially is apartments or condos with less space, (As regular houses are usually 100 sq. ft, compact kitchens usually have to fit on a 6 - 8 sq. ft space). 

Compact Kitchens

Compact Kitchens aims to be a space and cost efficient alternative to regular size kitchens and now is mostly beneficial especially for small living spaces in urban cities.

Existing Compact Kitchens 


1) Compact Concept's 'Circle Kitchen' 

+ circle kitchen set
+ only 1.8 square metres (space efficient)
+ highly functional but also stylish and modern (fits people's taste in modern living?)
+able to rotate up to 180 degrees (flexibility)
+ provide various equiptment and appliance e.g. sink, microwave, fridge, cabinets, storage etc. 
- $6.500 - $ 15,000 (NOT COST EFFICIENT)
- how will it fit various kitchen layouts? probably not appropriate for gallery type kitchens 

https://freshome.com/2009/08/25/circled-kitchen-by-compact-concepts/


2) Kitchoo Kitchen - 'Rectangular Compact Kitchen 

+ very compact fit for small apartment spaces or terrace houses
+ compact w/ 2 burner induction hob, sink, fridge and small 2 space drawers (can also add a dishwasher and a range hood)
- only appropriate for very small spaces, probably for a single/ 2 person household
- not for families

https://www.homedit.com/compact-kitchen-designs-for-small-spaces/


3) Come Together (Albrecht Seeger & Martin Klinke)

+ various size options caters to different spaces & users (small, medium, large) 
+ can accomodate up to three guest or four with pull out chairs/stool
+ fit for small kitchen as it's modelled around 1 sq metres of space. 
+ easily accessible; slide i n trays etc.
- stool maybe too difficult for elders/children/disabled to sit down on as it's very narrow
- can become crowded (traffic congestion around the kitchen when there's more than 5 people

https://www.designboom.com/design/albrecht-seeger-martin-klinke-come-together/ 


4) Carré (Robert Schierjott & Ulrich Kohl)

+ great for customisation of needs - catering to people various needs
+ space efficient (1 sq metres) 
+ compact cubes can be pushed and pulled out
+ 2 modules (Main and Secondary) *Main is fixed for essentials e.g. gas port, kitchne sink and counter) ; *Second is movable and can be combined with main to make 6 configurations changing the shape of the design. 
- may be hard to get around
- sharp edges, irregular layout (not children friendly) 
- traffic congestion in kitchen is too many people crowd around.
no space for other essentials e.g. microwave, fridge (kitchen triangle is not complete)


Other Considerations

Compact storage containers - recyclable pots, glass bottles, baskets etc to reduce waste
+ move non-essential kitchen appliances somewhere elsse e.g. washing machine to bathroom? to maximise space in kitchen 
+ have trolleys or movable storage?
+ utilise unused spaces for storage

Thoughts & Reflection:

I think my focus on the compact kitchens regarding to my research on the effects n urbanisation to kitchen has given me som indication on which direction I should create my ideas to. Incorporating ideas about compact kitchens and it's advantages towards space efficiency and possible cost efficiency I thought maybe I can apply these to reinventing the kitchen spaces in different house types mainly found in the UK e.g. terrace, semi-detached and detached as well as kitchen layouts. This also led me to think of maybe breaking the kitchen triangle. can I have them all in one direction instead?